Installing Pterodactyl
To install it, we need dependencies:
PHP 8.0 or 8.1 (recommended) with the following extensions: cli, openssl, gd, mysql, PDO, mbstring, tokenizer, bcmath, xml, dom, curl, zip, (and fpm if you plan to use NGINX.)
MySQL 5.7.22 or higher (MySQL 8 recommended) or MariaDB 10.2 or higher.
Redis (redis-server) (Optional) (But this will make the panel run much faster under heavy loads).
Web server (Apache, NGINX)
curl
tar
unzip
git
composer v2
The example will use the ubuntu system
Adding repositories
apt -y install software-properties-common curl apt-transport-https ca-certificates gnupg
LC_ALL=C.UTF-8 add-apt-repository -y ppa:ondrej/php
Install mariaDB
curl -sS https://downloads.mariadb.com/MariaDB/mariadb_repo_setup | sudo bash
Next you need to update the repositories
apt update
Adding Universe Repositories
apt-add-repository universe
Now install all required dependencies
apt -y install php8.1 php8.1-{common,cli,gd,mysql,mbstring,bcmath,xml,fpm,curl,zip} mariadb-server apache2 tar unzip git (redis-server - Optional)
Since we will install the panel through composer, you need to install it
curl -sS https://getcomposer.org/installer | sudo php -- --install-dir=/usr/local/bin --filename=composer
Create a folder where the panel will be installed
mkdir -p /var/www/pterodactyl
cd /var/www/pterodactyl
Downloading the panel
curl -Lo panel.tar.gz https://github.com/pterodactyl/panel/releases/latest/download/panel.tar.gz
Unpacking it
tar -xzvf panel.tar.gz
We issue the necessary rights to the folders.
chmod -R 755 storage/* bootstrap/cache
Next, you need to create a database
Go to mysql (When prompted, enter the password from root)
mysql -u root -p
Commands to be entered:
CREATE USER 'pterodactyl'@'127.0.0.1' IDENTIFIED BY 'yourPassword';
We create a user and instead of yourPassword enter the desired password (Save it, you will need it during setup).
Create the base itself (Instead of -panel, you can write another name)
CREATE DATABASE panel;
We issue the necessary rights to the user whom we created earlier.
GRANT ALL PRIVILEGES ON panel.* TO 'pterodactyl'@'127.0.0.1' WITH GRANT OPTION;
and exit mysql.
exit;
Next, we need to copy the configuration files for the panel to work.
cp .env.example .env
composer install --no-dev --optimize-autoloader (We agree here)
Create an application encryption key.
php artisan key:generate --force
The command with which we will configure the panel itself.
php artisan p:environment:setup
Here are the points where you need to properly configure.
This article will be the easiest setup.
Ask for mail first. (you can specify any) This mail will be used as the mail of the creator of standard eggs (egg - a list of games that are available for installation)

The second one will ask you to enter the address of the site that the panel will use, (http://yoursite.com) enter the domain that you purchased (Required in the form http://yoursite.com). (You can change it in the apache \ httpd configurations (further in the settings you will need to configure to write the same domain, but without http://)

Next will be the time zone (Indicate UTC) Or just press enter

The next one will ask for the cache driver (Choose Filesytem - it will be easier.) (file) The screenshot says redis, but it's better to choose File to make it easier to configure.

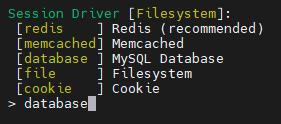
Select session driver Mysql. (database)

The queue driver (Queue driver) is also selected mysql. (database)

Next, they will offer a graphical parameter adjuster (here it’s just yes)

Now asks to send telemetry (Here at my discretion, but I put no)

Done, the panel setup is complete.
Сonnecting the database.
Now let's start connecting the database.
php artisan p:environment:database
The settings in this category are similar to the previous one.
1. Will query the database host. (Just press Enter if mysql is on the server itself)
2. Port (here, just like in the first paragraph, press enter)
3. Here you write down the name of the base that we created earlier and recorded the name in advance
4. Here we write down the user created in advance. (pterodactyl)
5. Create a password for the user.
This completes the installation of the panel.
The next step is to write the data to the database.
php artisan migrate --seed --force
If everything is configured correctly, there will be a large list of downloads to the database.
Now let's add a user.
php artisan p:user:make
The first will ask if this user is an administrator.
Write yes
Then he will ask for mail.
You can specify any.
Next, you need to enter the user's nickname (Any one will do - the main thing is to write it down somewhere, since it is needed to enter the panel)
The next item will ask you to enter your name. (any will do)
Last name (any name will do)
And the last item will require a password.
Any will do, but the main thing is to copy it to yourself somewhere.
Granting folder permissions
# When using Nginx or Apache:
chown -R www-data:www-data /var/www/pterodactyl/*
Create a cron run
Type crontab -e and add this line to the end.
* * * * * php /var/www/pterodactyl/artisan schedule:run >> /dev/null 2>&1
Now let's add a service so that we can start the panel and add it to startup.
You need to create a pteroq.service file in the /etc/systemd/system folder
You need to add these lines to the file:
::
::
# Pterodactyl Queue Worker File
# ----------------------------------
[unit]
Description=Pterodactyl Queue Worker
After=redis-server.service
[service]
# On some systems the user and group might be different.
# Some systems use `apache` or `nginx` as the user and group.
User=www-data
Group=www-data
Restart=always
ExecStart=/usr/bin/php /var/www/pterodactyl/artisan queue:work --queue=high,standard,low --sleep=3 --tries=3
StartLimitInterval=180
StartLimit Burst=30
RestartSec=5s
[Install]
WantedBy=multi-user.target
::
::
Next, you need to create a pterodactyl.conf file in the /etc/apache2/sites-enabled (or conf.d) folder with the following lines.
::
::
<VirtualHost *:80>
ServerName Domain-that-was-created-previously-without-http://
DocumentRoot "/var/www/pterodactyl/public"
AllowEncodedSlashes On
php_value upload_max_filesize 100M
php_value post_max_size 100M
<Directory "/var/www/pterodactyl/public">
AllowOverride all
Require all granted
</Directory>
</VirtualHost>
::
::
Next you need to configure the Firewall
ufw allow http
ufw allow https
ufw reload
And you need to add a panel to autorun
systemctl enable --now pteroq.service
Ready. We installed the pterodactyl control panel.
The panel is available at your address: http://yoursite.com.

