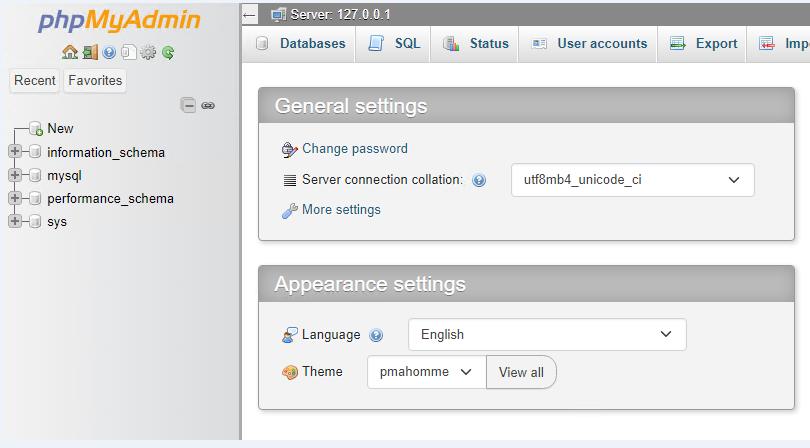
With phpMyAdmin you can create, configure, edit, delete databases and database objects on a server running MySQL.
For the web application phpMyAdmin to work, the server must already have the IIS web server running in conjunction with PHP and the MySQL database server installed and configured.
If these applications are not installed, you can use the following instructions: How to install and configure PHP on Windows Server, How to install and configure the IIS web server on Windows Server, How to install and configure MySQL on Windows Server.
How to install and configure PHP on Windows Server.
For all of the following steps, it is assumed that the IIS, PHP, and MySQL programs are already installed and running.
Let's get started with the installation.
1. In the folder C:\inetpub\wwwroot, create a folder called phpmyadmin

2. Go to Download phpMyAdmin and download the multi-language package *.all-languages.zip

3. Unzip the downloaded archive into the previously created folder C:\inetpub\wwwroot\phpmyadmin

4. Installation is complete. Open the page http://localhost/phpmyadmin/, you should see the standard phpmyadmin panel login form

4.1 Installation Note.
At this point, when you open the page http://localhost/phpmyadmin/, the following errors may occur:
4.1.1 Error 1. Handler not found. The error page looks like this:

Solution: create a php file handler for the web server. The screenshots below show how this can be done.


4.1.2 Error 2. PHP extension (module) not found. For example, mysqli (as in the screenshot)

Solution: enable the required extension in the php.ini file and restart the IIS web server. The php.ini file is located in the folder where PHP was previously installed (in our example it is C:\php\). To enable the extension you need, you need to find it by name in the php.ini file and uncomment (remove the ;; character from the beginning of the line) the line with the extension name.

After saving the php.ini file, you must restart the web server

5. In the root phpmyadmin folder, you need to find the config.sample.inc.php file and rename it to config.inc.php. Next, open config.inc.php in Notepad or another text editor (Notepad++ is recommended) and uncomment (remove the // characters from the beginning of the line) the following lines:
$cfg['Servers'][$i]['pmadb'] = 'phpmyadmin';
$cfg['Servers'][$i]['bookmarktable'] = 'pma__bookmark';
$cfg['Servers'][$i]['relation'] = 'pma__relation';
$cfg['Servers'][$i]['table_info'] = 'pma__table_info';
$cfg['Servers'][$i]['table_coords'] = 'pma__table_coords';
$cfg['Servers'][$i]['pdf_pages'] = 'pma__pdf_pages';
$cfg['Servers'][$i]['column_info'] = 'pma__column_info';
$cfg['Servers'][$i]['history'] = 'pma__history';
$cfg['Servers'][$i]['table_uiprefs'] = 'pma__table_uiprefs';
$cfg['Servers'][$i]['tracking'] = 'pma__tracking';
In addition, replace the word localhost with 127.0.0.1

Save the config.inc.php file.
6. In your browser, go to http://127.0.0.1/phpmyadmin and log in with the root user credentials whose password was created during installation on the MySQL server.


7. To store service information, phpmyadmin uses its own database, which we will now create. We will also create a user with full rights to this database.
To create the database, we will use a ready dump provided by the developers in the file create_tables.sql. This file is located in the sql subfolder. To import this dump, from the main phpmyadmin page, go to the Import tab


select the file create_tables.sql

Click the Import button (at the very bottom of the form) and wait for the database import to complete.
The phpmyadmin database should now appear in the list
.

Now let's create a MySQL account and grant permissions to the database we just created. To do this, go to the phpmyadmin database and click on Privileges - Add user / Add user account

Fill in the form fields as indicated in the screenshot

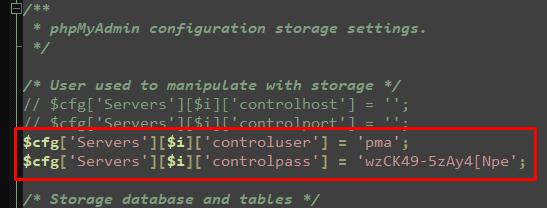
In the config.inc.php file, you need to uncomment the lines and write the access data of the previously created user pma
$cfg['Servers'][$i]['controluser'] = 'pma';
$cfg['Servers'][$i]['controlpass'] = 'pmapass';
pmapass is the password for user pma

In this article we learned how to install phpmyadmin on Windows Server.

