Microsoft Defender (formerly known as Windows Defender) is a built-in antivirus and protection system developed by Microsoft for Windows operating systems. Windows Server 2019 also includes this component to prevent and detect malware. However, in some situations, administrators may want to disable Defender because of a conflict with other antivirus software or to optimize server performance. In this article, we will look at how to disable Microsoft Defender on Windows Server 2019 for novice users.
Method 1: Disabling Microsoft Defender via Group Policy
-
Open "Explorer" and right-click the "This Computer" icon. Then select Manage.

-
In the Computer Management window that opens, go to Services and Applications and select Services.

-
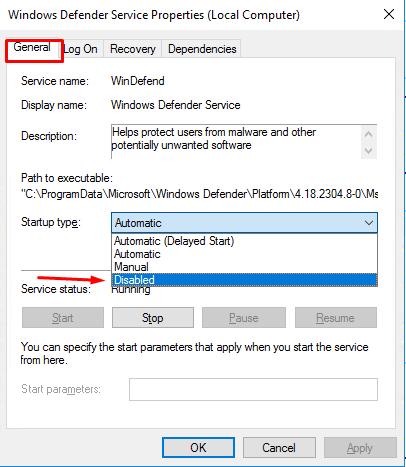
Find and double-click the Windows Defender service to open its properties.

-
In the General tab, change the startup type to Disabled and click OK.

-
Now open "gpedit.msc" (local group policy editor) with a Windows search or the command line.
-
In the Local Group Policy Editor, go to the following path: Computer Configuration > Administrative Templates > Windows Components > Windows Defender.

-
Find and double-click the "Disable Windows Protector" option.
-
In the window that appears, select "Enabled" and click "OK" to save your changes.

-
Reboot the server to apply the changes.
Method 2: Disabling Microsoft Defender via the registry
-
Open "regedit" (registry editor) with a Windows search or the command line.
-
In the registry editor, go to the following path: HKEY_LOCAL_MACHINE\SOFTWARE\Policies\Microsoft\Windows Defender.

-
If the "Windows Defender" key is missing, create one by right-clicking on "Microsoft" and selecting "New" > "Key". Name the new key "Windows Defender".
-
Next, right-click on the "Windows Defender" key and select "New" > "DWORD (32-bit value)".

-
Name the new value "DisableAntiSpyware" and set its value to "1".

-
If you want to disable the cloud protection as well, create another DWORD value (32-bit value) named "DisableCloudProtection" and set its value to "1".

-
Close the registry editor and restart the server to apply the changes.
Please note: Registry editing may cause system instability if done incorrectly. It is recommended that you back up the registry or create a system restore point before making changes.
Conclusion
In this article, we looked at three ways to disable Microsoft Defender in Windows Server 2019 for novice users. Disabling Defender can be useful to improve server performance or eliminate conflicts with other antivirus solutions. However, before you disable Microsoft Defender, make sure you have alternative antivirus software installed and configured to protect the server from malware and other threats.

