This is a great advantage, as it takes off the load from the server with a large number of requests to one page.
This applies to those pages that do not change, or change rarely.
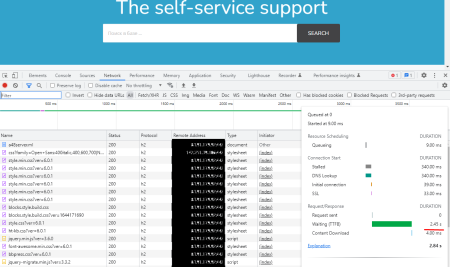
Assume a large number of users are browsing the homepage at the same time. The response from the server for all users will be about 2 seconds before the first byte. This is due to the fact that the server needs to process this request and only then issue it.
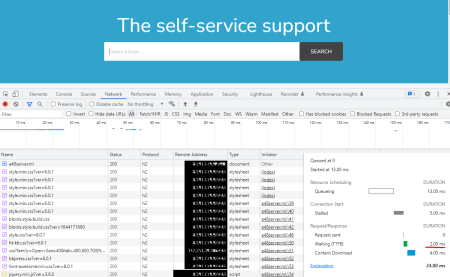
To reduce the response to the first byte, we use FastCGI Microcache.
At the beginning, my site config looks something like this:
                    server {
                        listen      xx.xx.xx.xx:443 ssl http2;
                        server_name site.com www.site.com;
                        root        /home/admin/web/site.com/public_html;
                        index       index.php index.html index.htm;

                        ssl_certificate      /home/admin/conf/web/ssl.site.com.pem;
                        ssl_certificate_key  /home/admin/conf/web/ssl.site.com.key;

                        location / {

                            try_files $uri $uri/ /index.php?$query_string;


                        }
And the server config is /etc/nginx/nginx.conf like this:
                    # Server globals
                    user                    nginx;
                    worker_processes        auto;
                    worker_rlimit_nofile    65535;


                    # Worker config
                    events {
                            worker_connections  1024;
                            use                 epoll;
                            multi_accept        on;
                    }


                    http {


                        # Compression
                        gzip                on;
                        gzip_vary           on;
                        gzip_comp_level     5;
                        ....
                        ....

                    }
First you need to determine the location and set the parameters for storing cached requests.
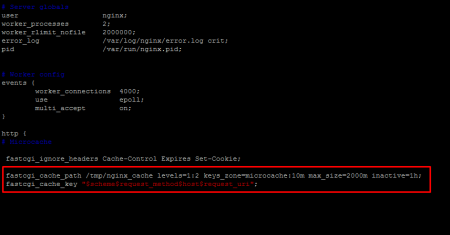
In the server config (in my case /etc/nginx/nginx.conf) add the following construction to the http block:
fastcgi_cache_path /tmp/nginx_microcache levels=1:2 keys_zone=microcache:10m max_size=500m inactive=1h;
fastcgi_cache_key "$scheme$request_method$host$request_uri";
Where:
fastcgi_cache_path - Specifies the location of the cache on the server. This directory will be cleared every time the server is restarted. What will be stored in this folder will also take up space in RAM.
levels=1:2 - sets a two-level directory hierarchy in the /tmp/nginx_microcache folder
keys_zone - set the name of the zone (You can specify your preferences)
keys_zone=microcache:10m - 10m — zone size (there can be many such zones for each site separately if necessary).
max_size=500m - the size of the space that will be occupied by the cache. (An area is allocated in RAM. The main thing is not to overdo it.) Its size should be less than the system RAM + swap. Otherwise, the error "Unable to allocate memory" is possible.
inactive - sets the time after which the cache located in /tmp/nginx_microcache and in RAM that have not been accessed during the time specified (1 hour) are removed from the cache. (Default inactive=10m)
Next, you need to set the keys that will indicate which requests need to be cached. This is set by the fastcgi_cache_key directive.
fastcgi_cache_key - determines which requests will be cached.
Variables used in factcgi_cache_key
$scheme - HTTPS or HTTP request scheme
$request_method - Specifies the request methods, such as GET or POST.
$host - Name of the server corresponding to the request
$request_uri — Full request URI
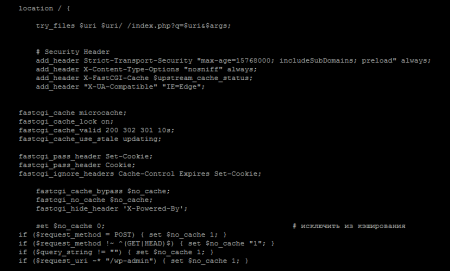
Now, in order to connect the selected area to our site, it is necessary to add the following construction to its config in my case (/home/admin/conf/web/xxxxx.xxx.nginx.ssl.conf) in the location / block:
location / {

#MicroCache

                    fastcgi_cache microcache;
                    fastcgi_cache_lock on;
                    fastcgi_cache_valid 200 20s;
                    fastcgi_cache_use_stale updating;

                    # Security Header

                    add_header X-FastCGI-Cache $upstream_cache_status;


                    #Задаем условия, при которых ответ не будет браться из кэша.

                    fastcgi_cache_bypass $no_cache;
                    fastcgi_no_cache $no_cache;

                        set $no_cache 0;
                        if ($request_method = POST) { set $no_cache 1; }
                        if ($request_method !~ ^(GET|HEAD)$) { set $no_cache "1"; }


                        if ($query_string != "") { set $no_cache 1; }
                        if ($request_uri ~* "/admin") { set $no_cache 1; }

        }
}

The fastcgi_cache directive sets the same zone name that is defined in the server config. In my case microcache. (For each individual site, you can set your own zones)
fastcgi_cache_valid - Determines the cache time depending on the HTTP status code (200, 301, 302). In the example above, responses with status code 200 will be cached for 10 seconds. You can also use a time period like 12h(12 hours) and 7d(7 days).
For dynamic content, such as the admin panel of any CMS, this is highly undesirable.
The # Security Header block defines the headers add_header X-FastCGI-Cache $upstream_cache_status; which show the status of the request, whether the page is cached or not. MISS, BYPASS, EXPIRED, and HIT are the most common headlines.
The HIT value can be observed when the page is retrieved from the cache. If in the header EXPIRED - then this indicates that the cache for this request or page is out of date, that is, the allocated time that is described in the fastcgi_cache_valid directive in my case 10 seconds - is out.
BYPASS status - we can observe when a request/page is not cached. The rules for what will not get into the cache are described in the #Set conditions under which the response will not be taken from the cache. In my case (any CMS) all /admin pages in the admin panel will not be cached. This is important because here the content is constantly changing.
The MISS status means that the page is not cached.
					[root@a48zomro ~]# curl -I https://site.com/
                    HTTP/1.1 200 OK
                    Server: nginx
                    Date: Sun, 29 May 2022 11:13:13 GMT
                    ....
                    ....
                    X-FastCGI-Cache: MISS


                    [root@a48zomro ~]# curl -I https://site.com/
                    HTTP/1.1 200 OK
                    Server: nginx
                    Date: Sun, 29 May 2022 11:13:23 GMT
                    ....
                    ....
                    X-FastCGI-Cache: HIT

                    [root@a48zomro ~]# curl -I https://site.com/admin/
                    HTTP/1.1 302 Found
                    Server: nginx
                    Date: Sun, 29 May 2022 11:13:32 GMT
                    ....
                    ....
                    X-FastCGI-Cache: BYPASS

                    [root@a48zomro ~]# curl -I https://site.com/
                    HTTP/1.1 200 OK
                    Server: nginx
                    Date: Sun, 29 May 2022 11:13:39 GMT
                    ....
                    ....
                    X-FastCGI-Cache: EXPIRED
Before optimization:

After:


