Specialized hostings for Minecraft severely limit a server's management options?
In this case, you can install your ouw custom Minecraft server, i recommend ordering a general-purpose virtual server (VPS), on such a server you can install any software, any number of mods and perform any settings / installations, limited only by the technical characteristics of the server. The server is completely under your control.
In this article, I will show you how to perform a basic installation of the Minecraft: Java Edition 1.18.2 game server on a virtual server (VPS) with Ubuntu 20.04
1. First you need to decide on the system parameters.
Minimum parameters for 1-3 players (resources used by the operating system are also taken into account):
Operating system: Ubuntu 20+ (considerably less resource intensive than Windows)
Processor: 2-3 cores
RAM: 3-4 GB
The more players, mods, or the larger the world, the more powerful the server is required.
If you take a weaker system, the game may work, but most likely it will lag a lot in certain locations and may crash.
For example, I will use the VPS Mega tariff with 3 processor cores and 4 GB of RAM.
You can order such a server or any other using the link:
https://zomro.com/eng/vds
2. After activating the server, you need to connect to the server console via the SSH protocol.
Instructions on how to connect to a Linux server via SSH can be found here:
https://zomro.com/blog/faq/218-kak-vojti-na-linux-server-po-ssh
3. Let's install a required software:
To get started, type the command below to perform a system update:
apt-get update -y && apt-get upgrade -yOn the next step we will install required software:
apt install -y wget screen
apt install -y openjdk-17-jdk
Check if Java is installed, Minecraft: Java Edition 1.18.2 requires at least Java version 17
java -version
4. Now you need to enable the firewall and open the connection port that Minecraft uses, as well as port 22 for SSH connection:
ufw enable
ufw allow 22/tcp
ufw allow 25565
5. Create a folder that will contain minecraft files and enter it.
mkdir /opt/minecraft
cd /opt/minecraft
Now you need to download the Minecraft server file, the latest version of which can be downloaded from the official website:
https://www.minecraft.net/en-us/download/server
or find an older version here:
https://mcversions.net/
You can download the file via the link using the wget utility, here is an example for downloading minecraft-server version 1.18.2:
wget https://launcher.mojang.com/v1/objects/c8f83c5655308435b3dcf03c06d9fe8740a77469/server.jar6. Let's launch the Minecraft server:
java -Xms2048M -Xmx3472M -jar server.jar noguiHere -Xms2048M is the minimum 2GB of RAM the server can use, and -Xmx3472M is the maximum 3472MB.
This is the optimal setting for a server with 4 GB of RAM, but you will need to adjust these parameters to the characteristics of the server you have chosen. The rest of the RAM will be allocated to the operating system.
If everything is fine and the server has started, the following messages will be visible at the end:
[18:12:56] [Server thread/INFO]: Time elapsed: 25957 ms
[18:12:56] [Server thread/INFO]: Done (26.676s)! For help, type "help"
If you see an error at startup:
[23:59:37] [ServerMain/ERROR]: Failed to load properties from file: server.properties
[ServerMain/WARN]: Failed to load eula.txt
Then enter the following command and then restart the Minecraft server again:
sed -i.orig 's/eula=false/eula=true/g' ./eula.txt

java -Xms2048M -Xmx3472M -jar server.jar nogui
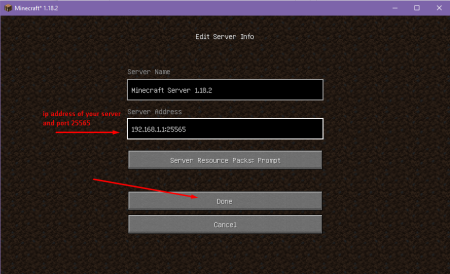
At this stage, you can already connect to the server through the Minecraft application by entering ip address and port of the server in format ipaddress:25565 and start playing the game.

If for some reason you need to stop the Minecraft server, you need to press the key combination Ctrl+c and wait for about 30 seconds.
7. If cannot connect and see next error :
# [User Authenticator #1/INFO]: Disconnecting /192.168.1.20:54401: Failed to verify username!
# [User Authenticator #1/ERROR]: Username 'zomro' tried to join with an invalid session
Try the following command and restart the Minecraft server again:
sed -i 's/online-mode.*/online-mode=false/g' ./server.properties

java -Xms2048M -Xmx3472M -jar server.jar nogui
This command will allow anyone to connect to the server, be it intruders or users without a purchased license for the Minecraft game, so be careful if you run the above command!
8. It is also recommended to change the default connection port from 25565 to any other, as this port is often attacked by intruders.
Replace the number 25565 in the following lines with any number in the range 10000-65000 and run these commands:
sed -i 's/server-port.*/server-port=25565/g' ./server.properties
ufw allow 25565
9. Finally, I'll show you one more useful feature.
How to make Minecraft server continue running in background, even after disconnecting from the SSH console and that after rebooting the virtual server, the minecraft server starts automatically?
Enter these 2 commands in turn:
echo -e '#!/bin/bash\\\\ncd /opt/minecraft/ && java -Xms2048M -Xmx3472M -jar server.jar nogui' > /opt/minecraft/launch_server.sh && chmod +x /opt/minecraft/launch_server.sh
mv /etc/rc.local /etc/rc.local.backup 2>/dev/null; echo -e '#!/bin/bash\\\\nscreen -dm -S minecraft /opt/minecraft/launch_server.sh\\\\nexit 0' > /etc/rc.local && chmod +x /etc/rc.local
Now after restarting the virtual server, the minecraft server will start automatically in the Screen utility,
You can view running Minecraft server with the command:
screen -r minecraftTo exit the Screen - press Ctrl+a and then press d.
That's all, I hope the article was useful to you, enjoy the playing!

